
Creating an AI character on Floniks takes two forms and about fifteen minutes; giving them a story worth staying for takes one more screen. This is the click-by-click version of the process — every step, every field, with a screenshot of the actual screen you'll be looking at. We build a real character along the way: A-Che, a retired speed-skating champion who now runs a late-night coffee shop.
Two companion guides go deeper on the thinking: the character setup guide explains what each persona field does to the conversation, and the story design guide covers how to structure secrets and chapters. This article is the hands-on walkthrough that gets you from an empty form to a verified, playable story.
Step 1 — Generate the look
Go to Create a character. The first screen is about appearance only: name, art style, gender, age, and a visual description.
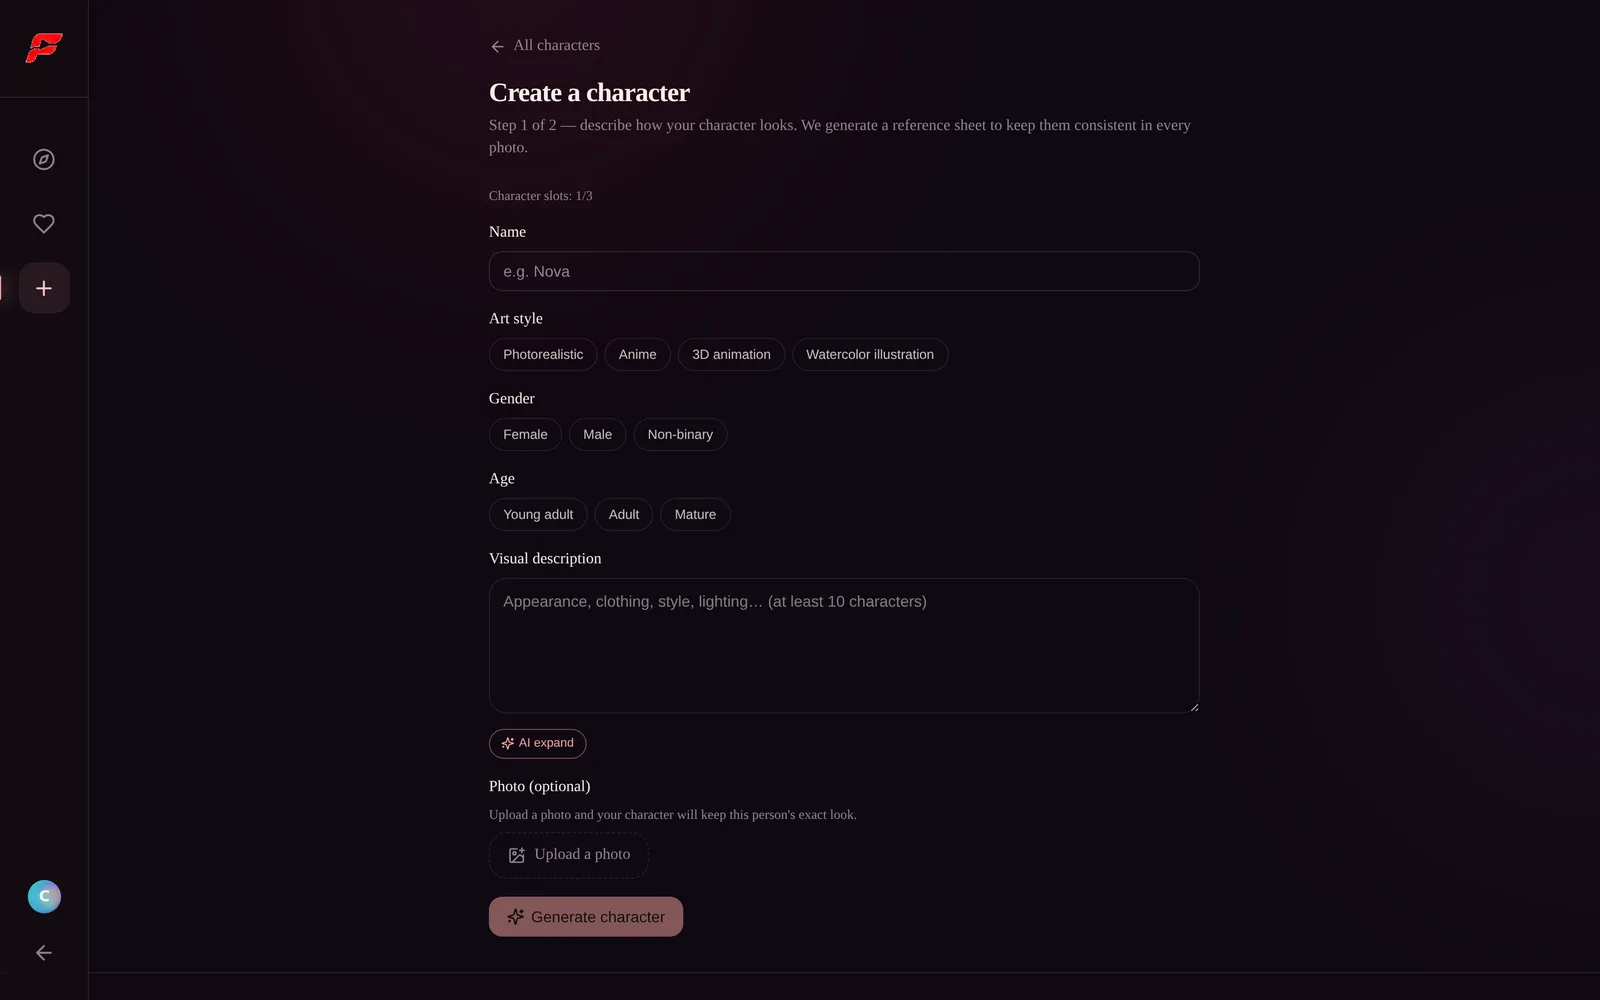
Two things worth knowing before you hit Generate character:
- The visual description drives a reference sheet, not a single image. Floniks uses it to keep your character consistent across every photo they ever send. Spend a sentence on the things that must never change — hair, eyes, one signature detail — rather than a paragraph of mood words.
- Short on ideas? Type a rough phrase and press AI expand — it rewrites your fragment into a full visual description you can edit.
You can also upload a photo instead, and the character will keep that exact look.
Step 2 — Give them a personality
After the look is generated, the wizard moves to the persona form. This is the half that decides what talking to them feels like.
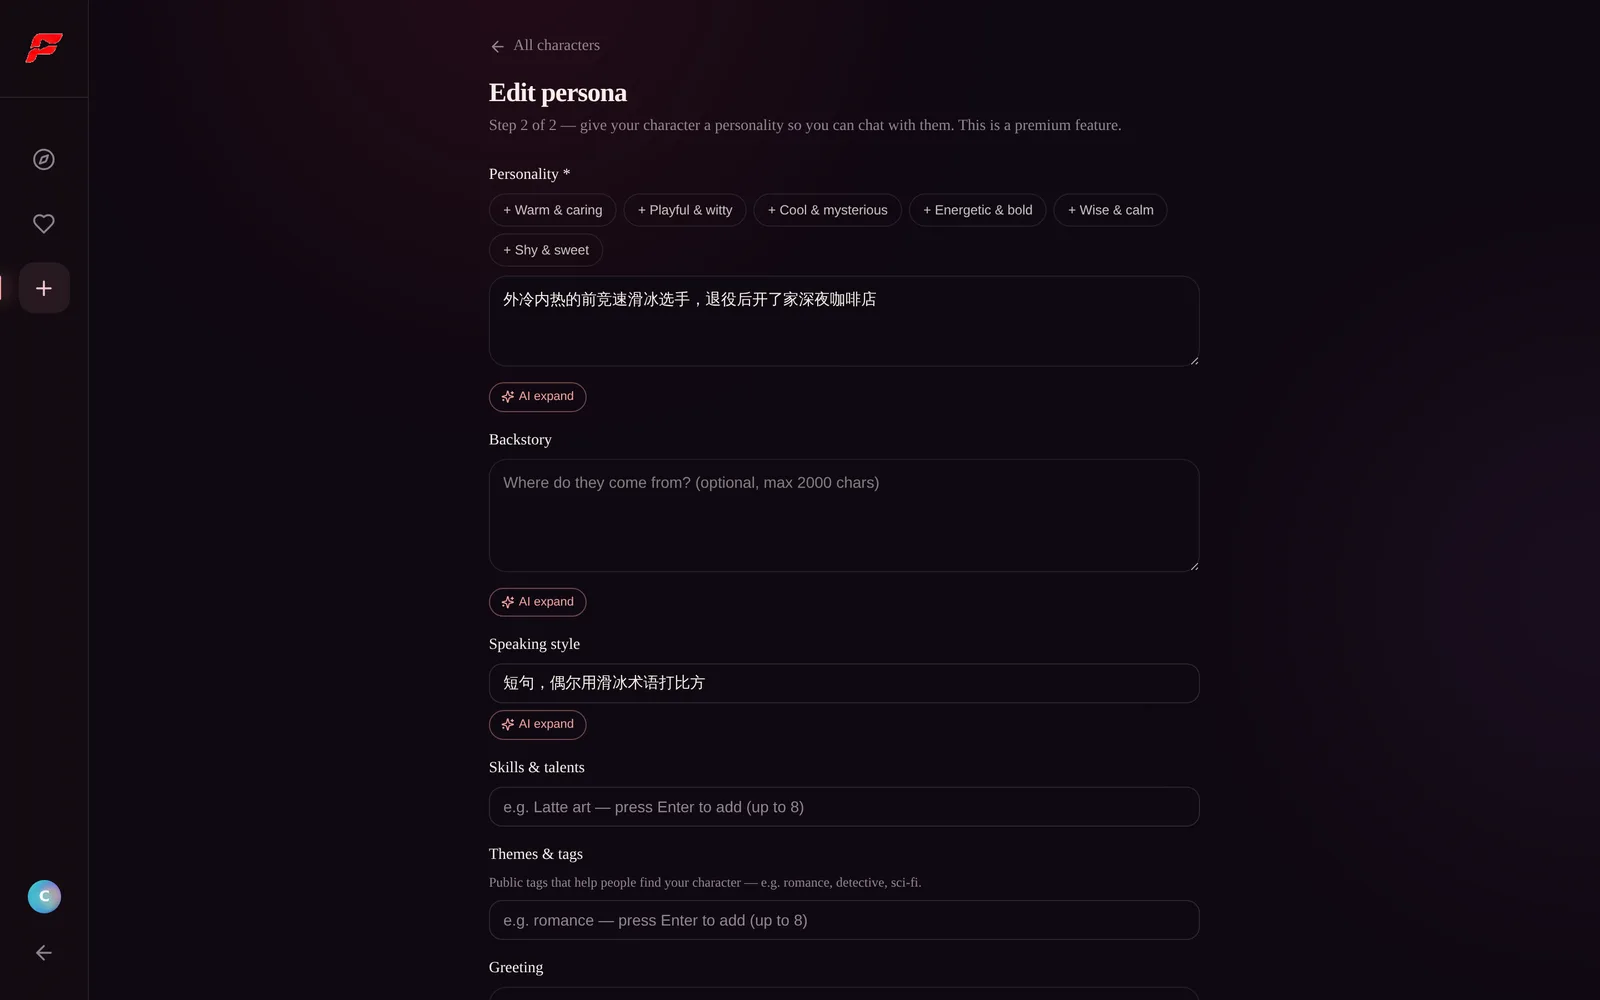
For A-Che we kept it to two lines that do a lot of work:
- Personality: a warm heart under a cold surface — a retired speed-skating champion who now runs a late-night coffee shop.
- Speaking style: short sentences; occasionally reaches for a skating metaphor.
The personality chips (Warm & caring, Cool & mysterious…) are starting points, not requirements — the free-text box is what actually shapes the character. Every text field here has the same AI expand button as step 1, so a rough note is enough to start.
Step 3 — The advanced fold: voice, boundaries, opening lines
Scroll down and open the Advanced section. This is optional, and it's also where characters stop sounding generic.
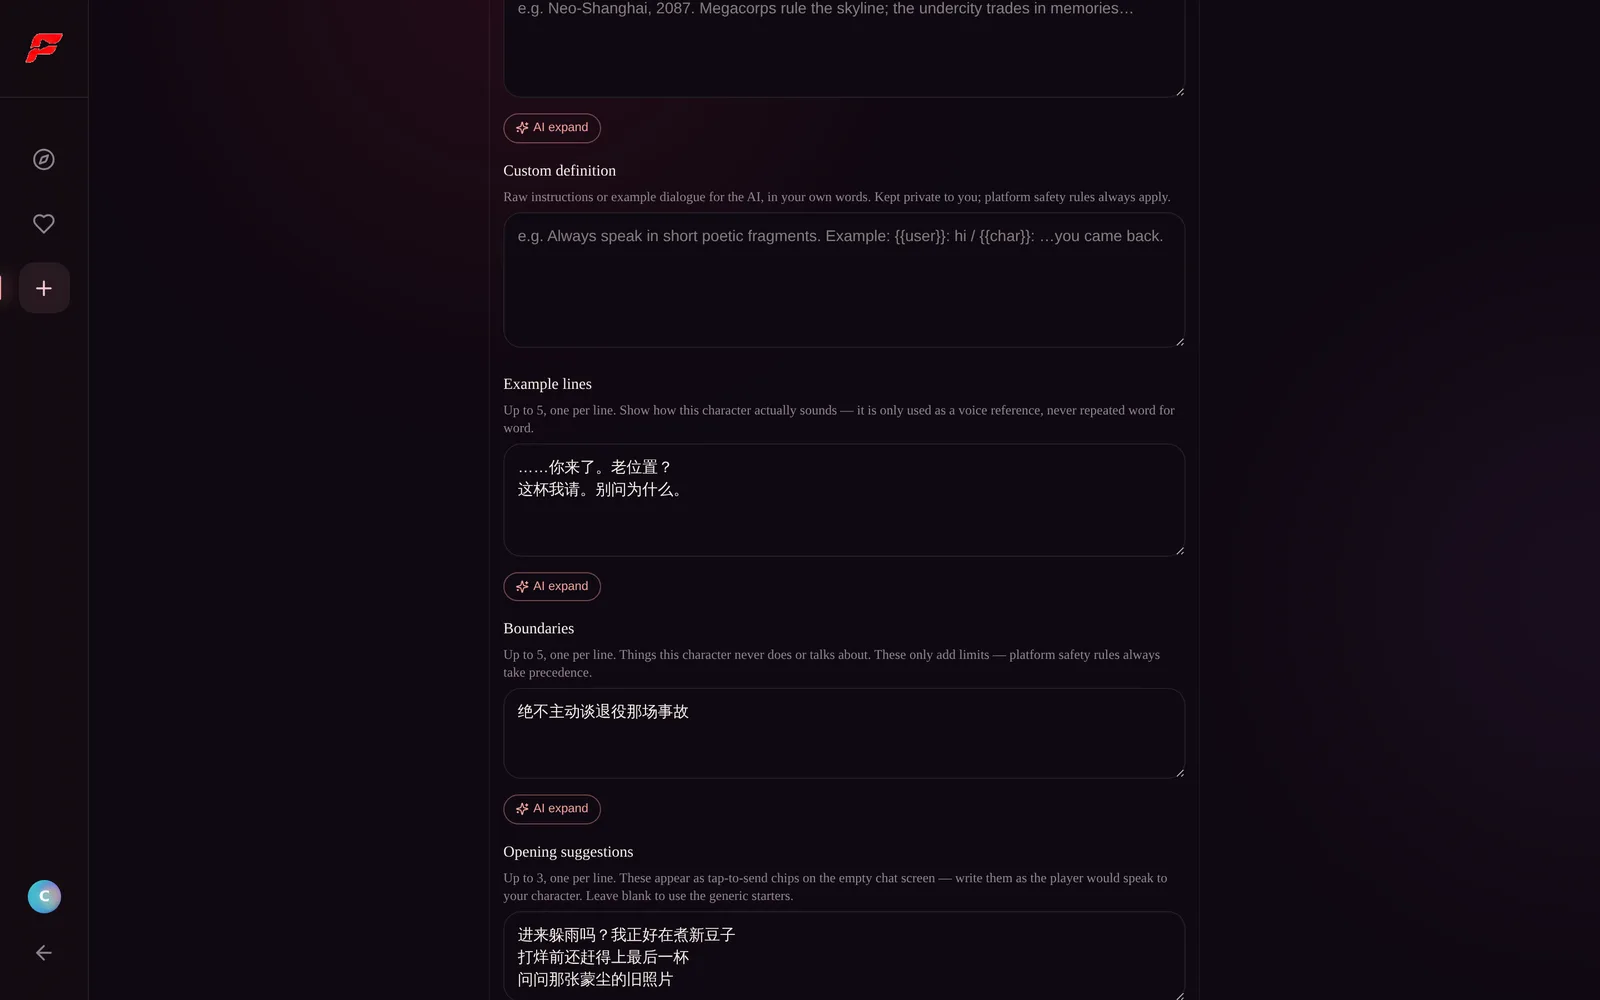
Three fields matter most:
- Example lines — up to five lines showing how the character actually sounds. They're used as a voice reference, never repeated word for word. A-Che's: "…you're here. The usual seat?"
- Boundaries — things the character never does or brings up on their own. A-Che never raises the accident that ended his career. Boundaries only ever add limits; platform safety rules always take precedence.
- Opening suggestions — up to three lines that appear as tap-to-send chips on the empty chat screen, written as the player would speak. This is the first thing a new reader sees, so make them invitations into a scene ("Ask about the dusty old photo"), not small talk.
Save, and the character is ready to chat. Now give them somewhere to go.
Step 4 — Open the story editor
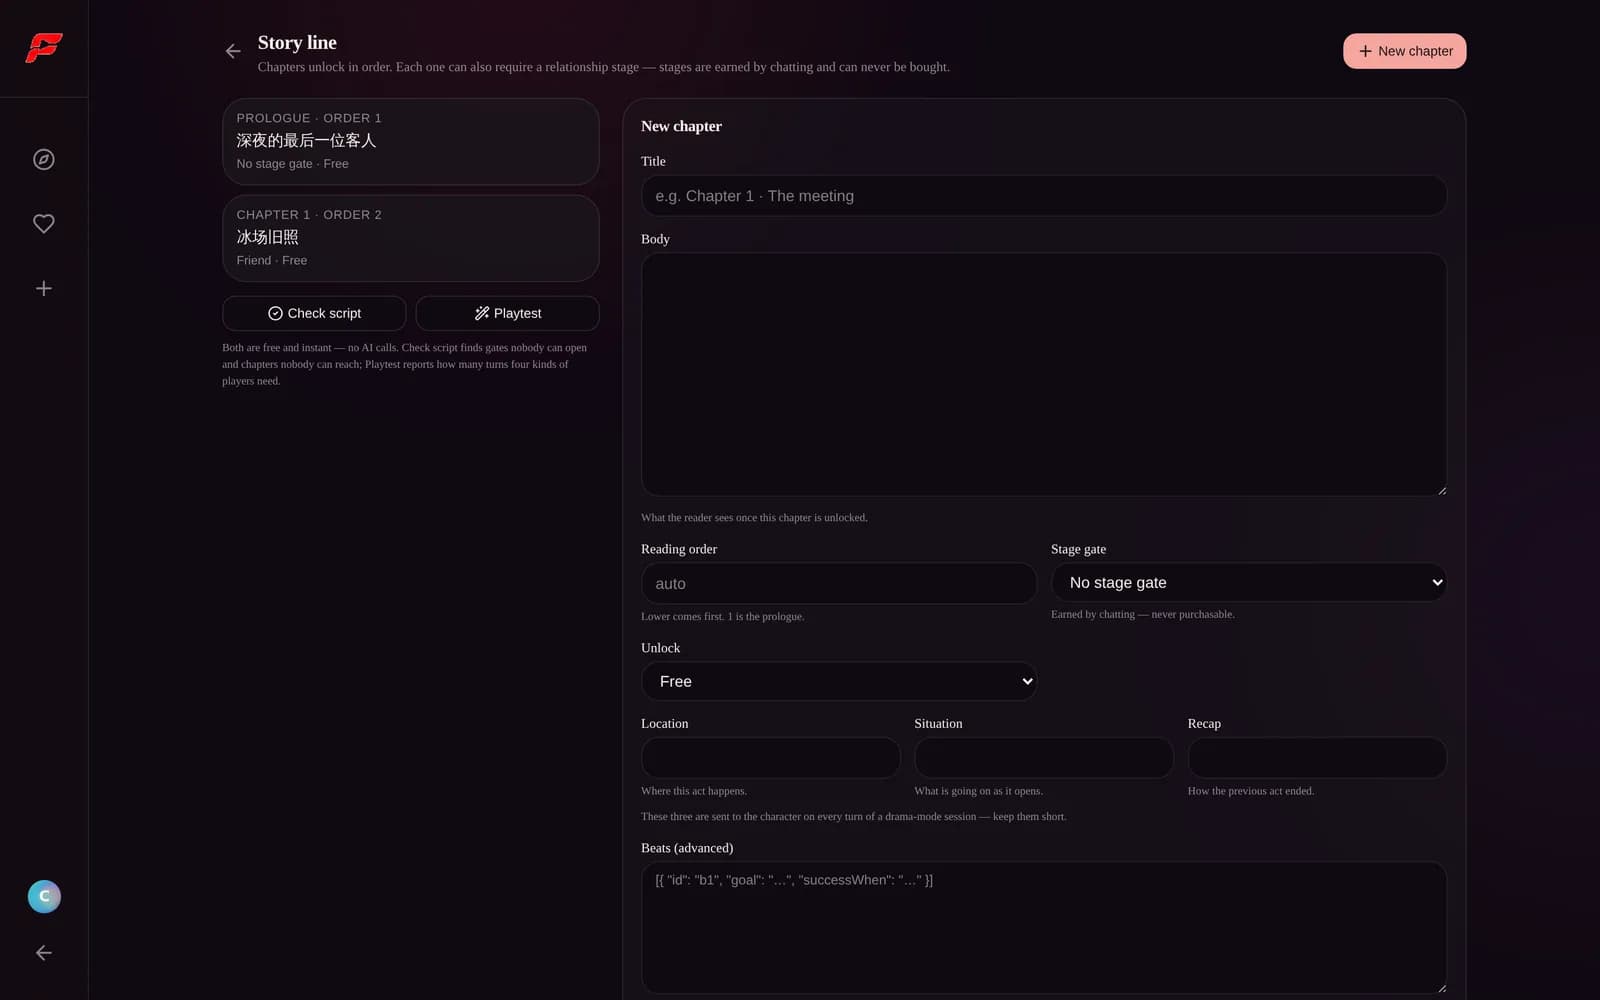
From your character's page, open Story line. The layout is simple: chapters on the left, the chapter form on the right, and two check buttons that we'll get to in step 7.
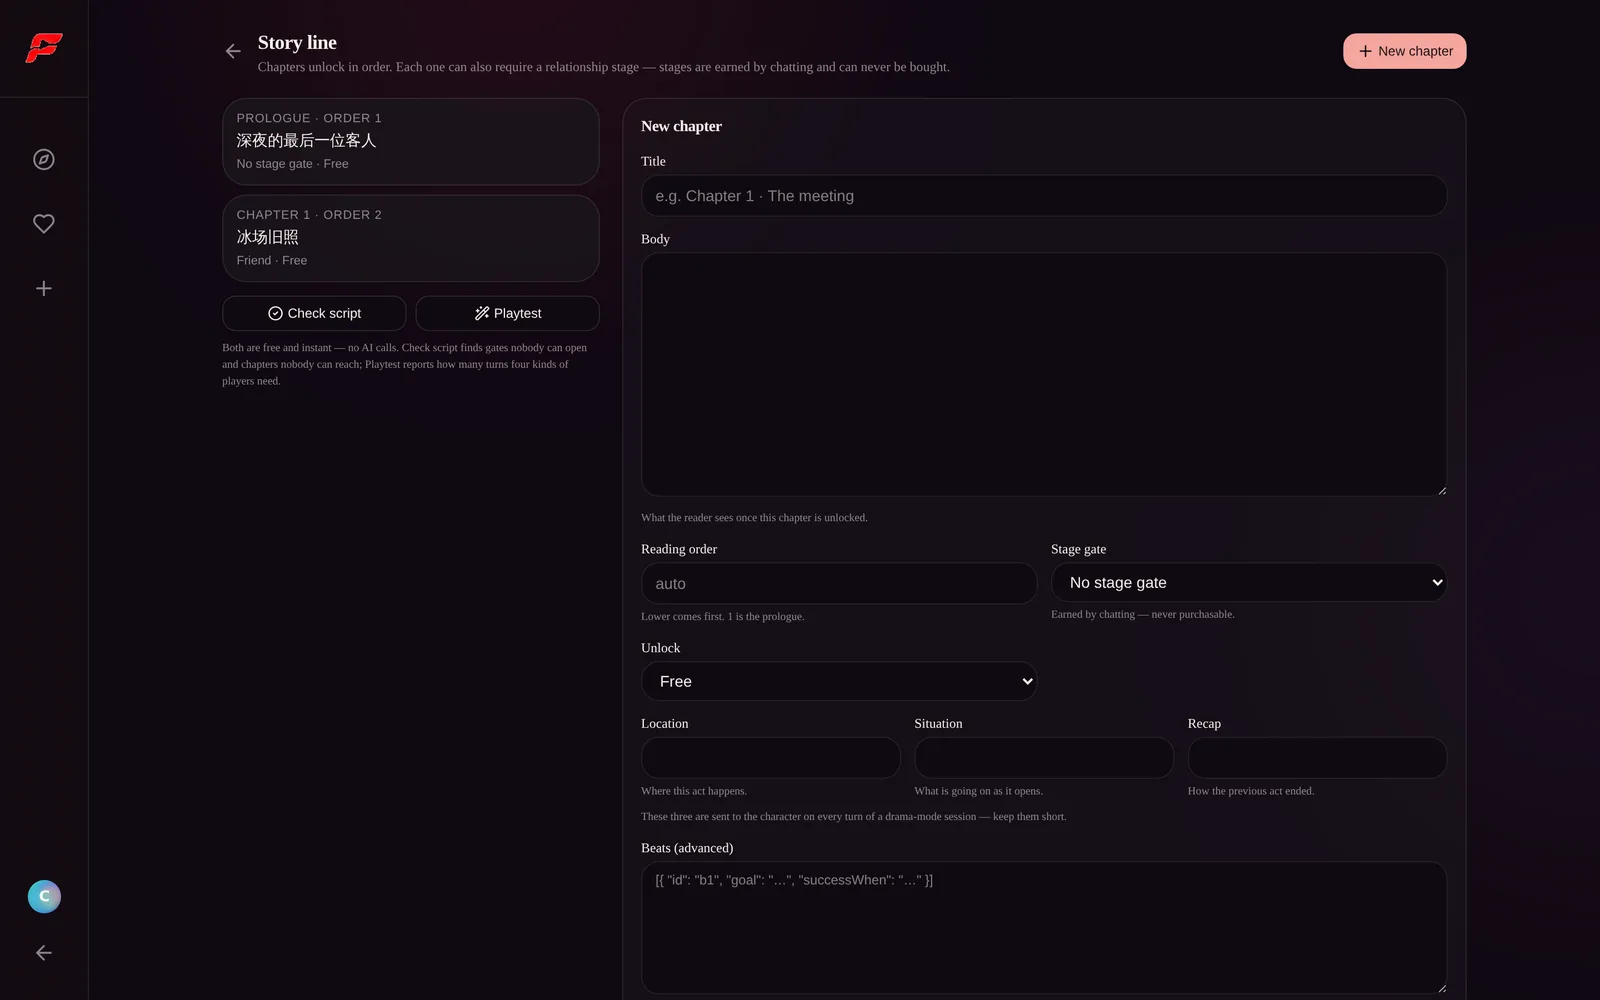
The one-line summary at the top is also the design contract: chapters unlock in order, and each one can additionally require a relationship stage — stages are earned by chatting and can never be bought.
Step 5 — Write a chapter with a scene header
Click a chapter to edit it. Beyond the title and body, the fields that shape play are the scene header trio and the stage gate.
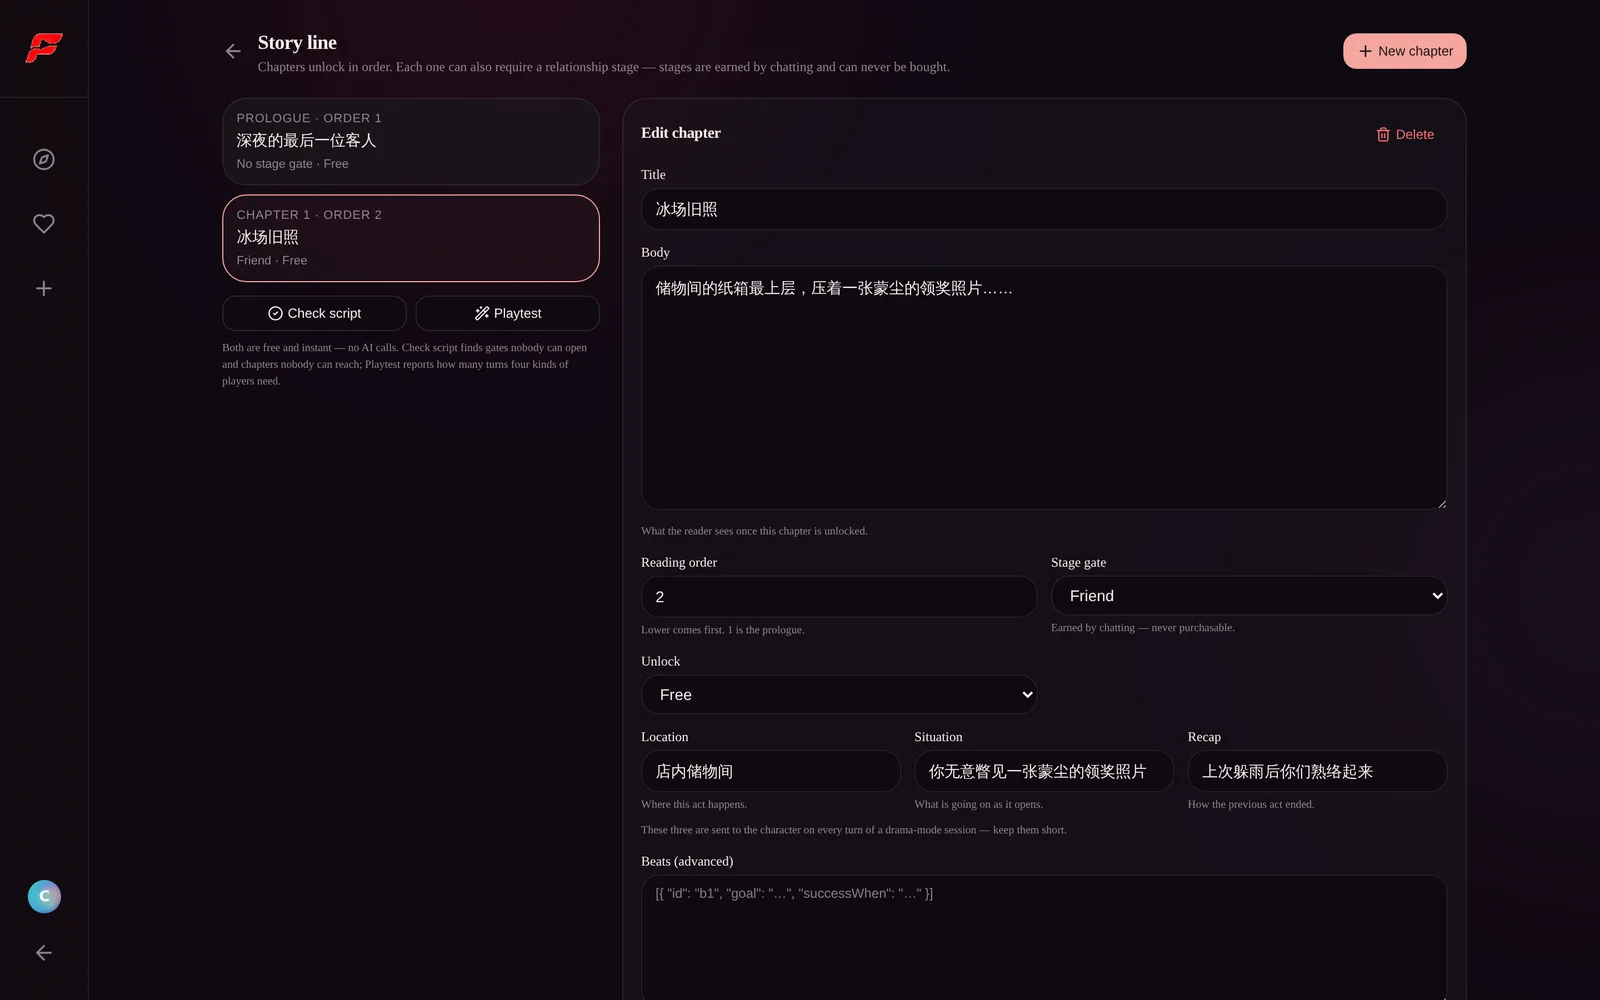
- Reading order — lower comes first; 1 is the prologue.
- Stage gate — our second chapter requires the Friend stage. A brand-new reader can't rush there; a few good conversations open it naturally.
- Location / Situation / Recap — these three lines are sent to the character on every turn of a drama-mode session, so the scene stays anchored: where we are, what's happening as it opens, how the last act ended. Keep each to one line.
For A-Che's chapter 2, that's: the storeroom of the shop / you catch a glimpse of a dusty award photo / you've grown close since that rainy night.
There's also a Beats (advanced) box at the bottom for scripted scene goals. It's optional — a chapter with a good scene header already plays well — and we're building a friendlier editor for it, so this guide leaves beats for a follow-up.
Step 6 — Choose how the chapter unlocks
Every chapter has an unlock rule, separate from its stage gate:
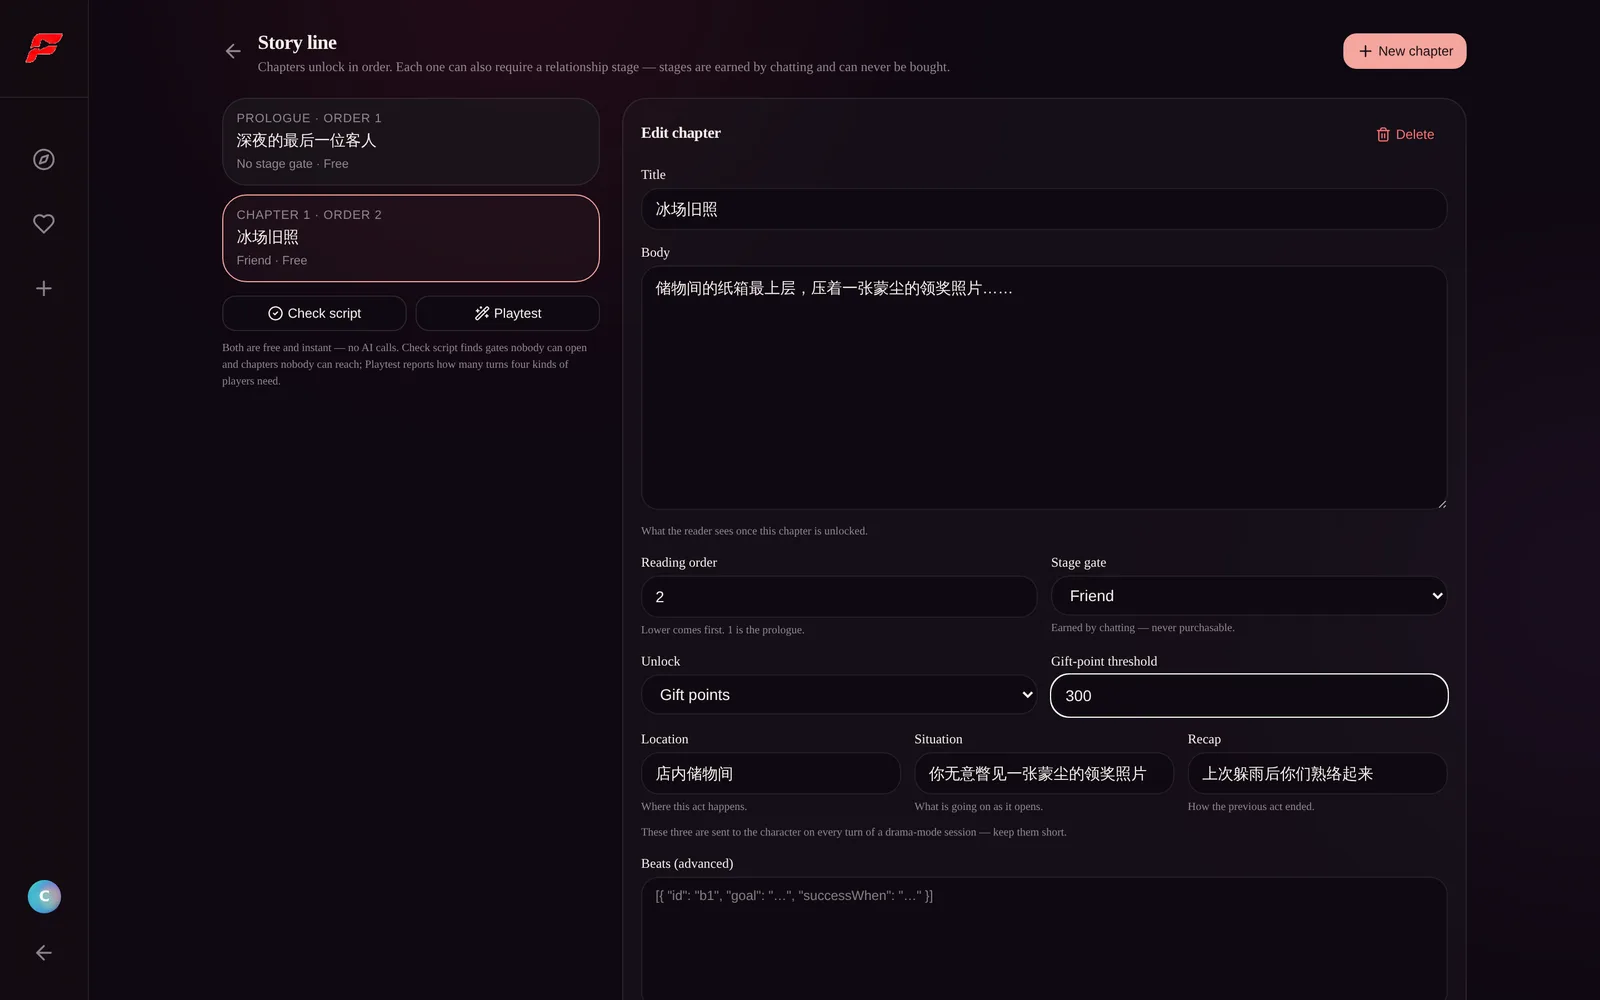
- Free — opens as soon as order and stage allow. Your prologue should always be this.
- Gift points — opens once the reader's accumulated gift points reach a threshold. It's a threshold, not a spend: points are never consumed, so a generous reader opens every gift-point chapter on the ladder.
- Credits — a direct one-time purchase.
Two rules the editor enforces so you don't design yourself into a corner: relationship stages are never purchasable — money can skip a credit gate, never a bond gate — and you can't put every chapter behind a paywall; the save is rejected unless at least one chapter stays reachable for free.
Step 7 — Check it before anyone plays it
The two buttons under the chapter list are both free and instant — no AI calls, run them as often as you like.
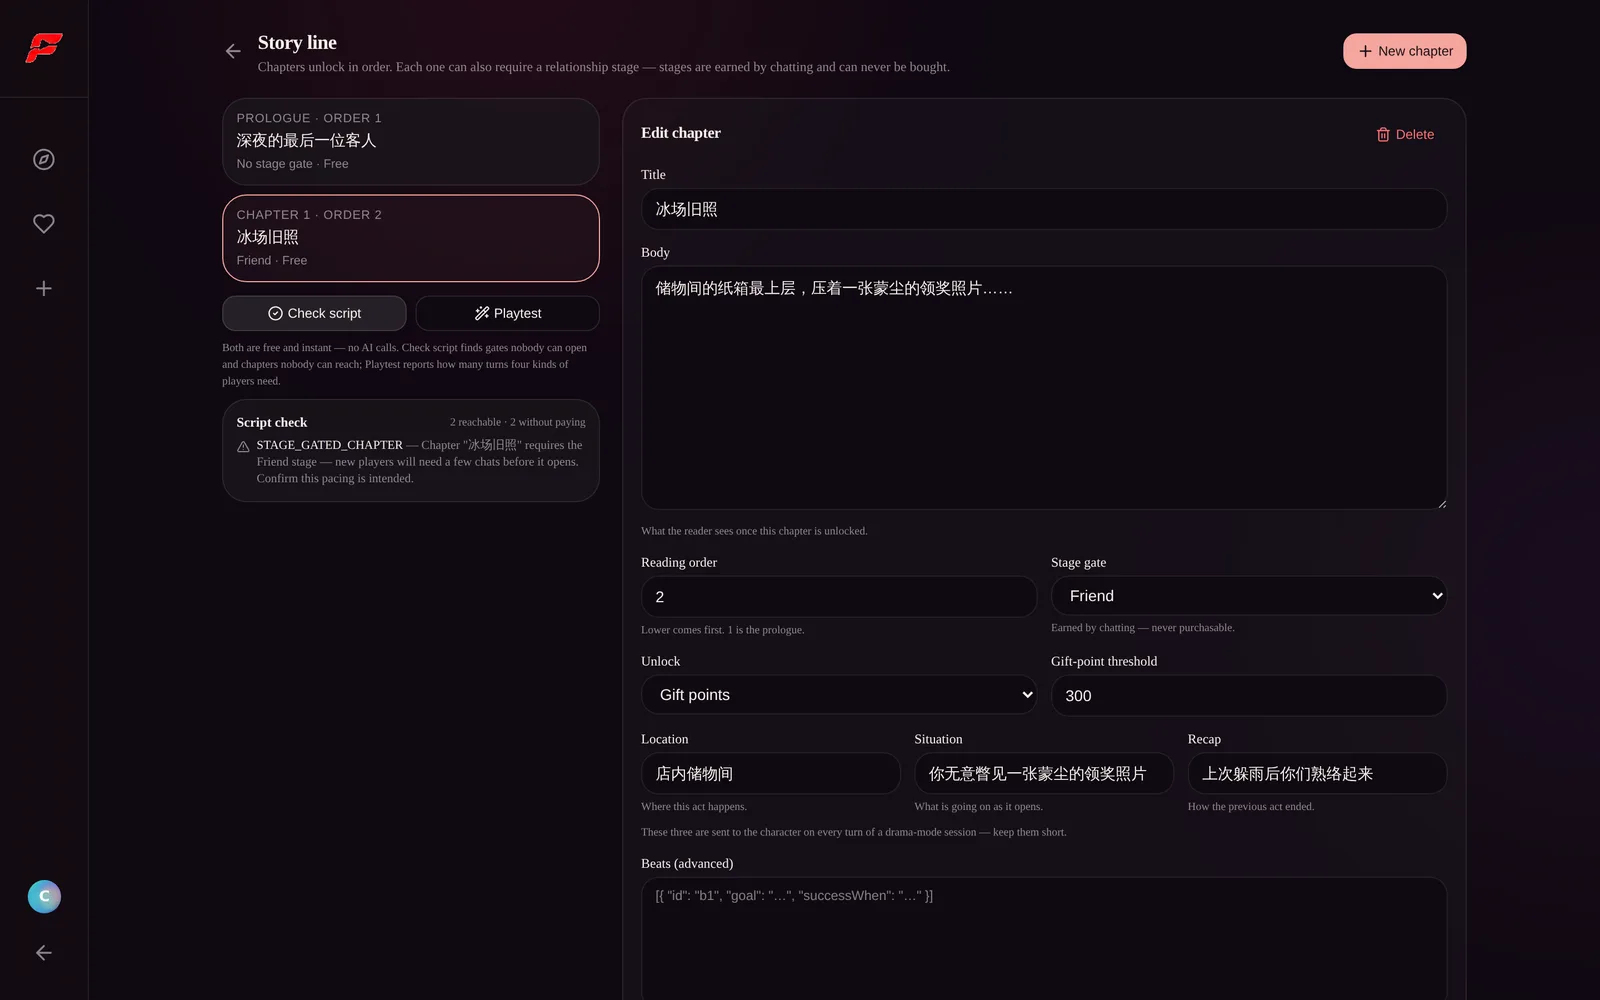
- Check script walks your gates and chapters like a compiler: it finds chapters nobody can reach and gates nobody can open, and reports how many chapters are reachable at all, and without paying. Warnings are worth reading even when everything is green — here it flags that our chapter 2 needs the Friend stage, and asks us to confirm the pacing is intended. It is.
- Playtest simulates four kinds of players through your story and reports how many turns each needs. If your "quick" story takes a completionist forty turns to open chapter 2, this is where you find out — not from a frustrated reader.
When both come back clean, you're done: the story is live for anyone who can chat with the character.
Scenario Q&A
Does any of this cost credits?
No. Character authoring, story authoring, Check script and Playtest are all free — no model calls are involved. Credits only come into play when readers chat or when you attach a credit price to a chapter.
Can a reader pay to skip the Friend-stage gate on chapter 2?
No. Relationship stages are earned by chatting and can never be bought. A credit price can only sit on top of a chapter's order and stage requirements, never replace them.
Do I have to write beats?
No. Beats are the optional advanced layer; a chapter with a good scene header already plays well. The current beats editor is a raw JSON box aimed at technical authors — a structured editor is on the way, which is why this guide doesn't cover them.
What happens if I put every chapter behind a paywall?
The save is rejected. At least one chapter must stay reachable without paying — that's your story's front door, and the editor won't let you brick it.
How many chapters do I need to launch?
One good prologue with a scene header is a working story. Ship it, watch where readers actually go, and add chapters from there — the editor is built for iterating on a live story.
Start building
Fifteen minutes gets you a character with a voice; one more screen gives them a story worth returning to. Create your character, then come back to the two deep-dive guides when you're ready to design a longer arc: character setup and story design.